Sometimes a flat airbrushed look is good for more sci-fi-inspired characters, but beyond just painting on a line along the edges to match a flat illustration, a piece can look even more significant with an actual dimensional edge. This also helps the ends of the chosen materials to be structurally sturdier, and gives a cleaner line and consistent edge width.
The basic approach is to attach trim directly along the outer top perimeter of the piece. A slightly textured grain is usually best for disguising where the edges will intersect. Satin-y ribbon is not recommended, as it frays easily (and is hard to Fray-Check without discoloring - as I learned from working on my first YURA) plus photographs kinda strangely. An alternative to pricy ribbon by the yard is also to dig through flat-style yarns. One gets a lot more that way and sometimes there are more interesting options than what is in the normal trim section. I've personally also used shoelaces and Foamie strips. If something is the right width and thickness, it can always be hand-painted or dyed to be the correct color, in any case.
 The basic look of "flat ribbon along an edge" tech is shown here in the armor for my second YURA outfit. To get around having to match up all the corners, I actually cheated in this case and cut the exact outline shape out of stretch vinyl, like a big wobbly O-like shape. If just ribbon had been used here, many individual pieces would have had to be matched at the corners. Since I was replicating a costume that does physically exist (and his real costume doesn't seem to have trim splice-lines) I had to opt for this more complicated method. |
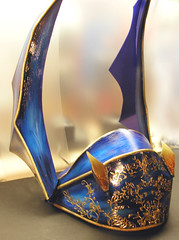
To go a step further, to simulate a formed metal piece, fabric piping can be attached along on the -inside- edge of the armor piece, to give a rounded "lip" to the ends, where the curve extends over the edge from underneath, outlining the armor. Piping applied this way can be bent at the corners in a more believable way than a top-layer ribbon can be. It can also be sandwiched in the middle of intersecting planes for rounded corners.
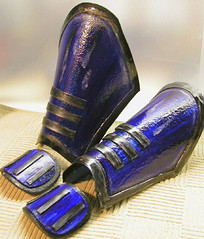
 Thick piping here makes up all the gold lines on the edge of the plates. 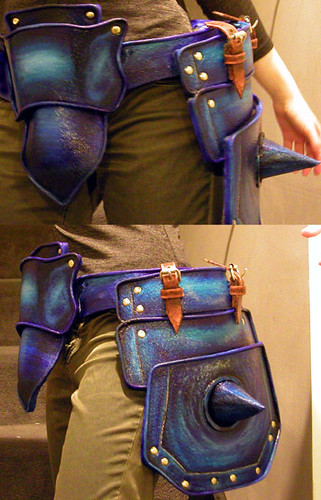 & all the piping here is the exact same stuff as above, just painted blue. Instead of just sitting on the top surface, it fully covers the side edge of each piece and is wrapped around to the back underside. |
Small gauge piping can be found packaged in the notions section of the fabric store - however, most times, I tend to want a much wider curve than prepackaged piping allots for, such as for Nightmare. Pre-made, uncolored thicker piping can sometimes be found with the drapery-making supplies, but recently I've not been able to locate any. Luckily, it can easily be replicated by hand, by sewing a casing of cotton strip with rope on the inside to give it its shape.
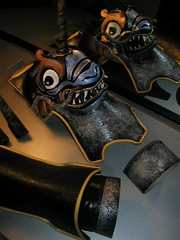 Albel's gauntlet was a combination of no edge, a painted edge, a flat trim edge and a rounded piping edge. The piping here has been painted gold and glossed to match the shiny look of the rest of the armor. |
For more complicated designs, a more textured cord or a braided rope can be substituted for extra ornate-ness. These can be found in the home-dec supplies, usually sold by the yard.
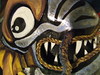 The mouth of the creature's face on Albel's shoulder armor uses a twisted cord, to add an extra highlight to that detail. |


No comments:
Post a Comment